I think there is no greater power on this earth than creativity: the freedom to forge, even in a small way, the world in the way that it should be. And I knew that my world needed a new creative fabric-and-programming project in it.
I’m not sure exactly when I got interested in learning to work with Arduino, but when I found out there were such things as sewable microchips I wanted to try my hand at working with them.
At first I wanted to make a simple galvanometer which powered colour-changing LEDs in response to electrical signals from a person’s skin, a bit like a light-up mood ring, but I couldn’t find an existing project for a galvanometer which used a sewable microchip. I’m not yet advanced enough to create a project of that complexity out of whole cloth, as it were, so I scrapped that idea.
Eventually I stumbled across Adafruit’s Textile Potentiometer Hoodie project, which is so well documented that I knew I would be able to adapt it to my own needs. Instead of a galvanometer I would have a motion-sensor-powered light-up…something.
I decided that I wanted a dance costume: something that would cause lights to change colour as the dancer moved. It needed to be nonrestrictive and yet mobile enough that the textile slide actuator would move with the dancer and change colours.
After some thought I settled on sewing the potentiometer to a loose sleeve so that as the dancer’s arms move, the sensor slides up and down the actuator, causing the lights to change colour as it goes. And so to the first challenge: installing the Arduino IDE.
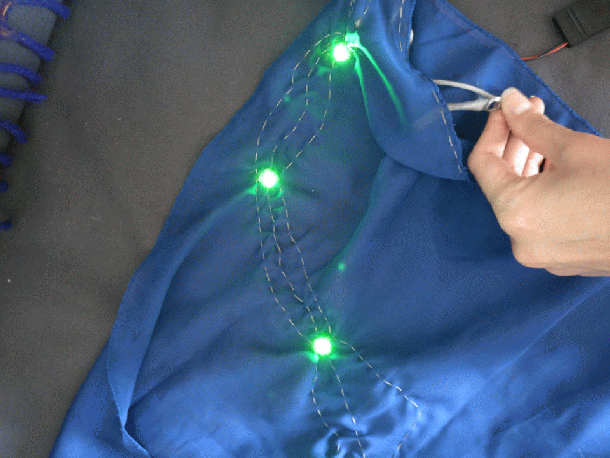
With every technical project, there eventually comes a point where something has gone very wrong and you can’t work out what it was. For me this point came early in the game when I could not for the life of me figure out how to install the right configuration of software, drivers, and other magic to get my computer to talk to my microchip. At least, I didn’t think it was working, but it turned out that it was probably doing the right thing for some time before I realised it. After much swearing and Googling, I eventually managed to get things in the right state. At that point, my project looked like this: 
As it turned out my troubles were only beginning: programming projects are always challenging, but add a hardware component into the mix (especially one involving conductive thread, which is basically like uninsulated wire) and suddenly you have the risk of fire as well as the risk of your project simply not working at all.
Fortunately the mild-to-moderate scorching my fabric endured wasn’t enough to damage the internal workings of my small electronics, nor to put me off the project. Nor did the point where I expectantly plugged everything in, pressed the ‘on’ button and… nothing happened. (Hint: when you buy a battery holder for your project, make sure you put the batteries in it.) After a lot of sewing (and yet more swearing) I at last reached a state where my project did this:
If you’re wondering, gentle reader, how to prevent your electronic fabric projects from burning you alive, the answer turns out to be nail polish.
I started with clear nail polish over my knots and anywhere two of the threads were too close together, causing a short circuit. (Note to self: do not make short circuits.) I then used silver polish over the long lines between the LEDs because clear would have looked strange. And at last, a sleeve was born:

The whole project took me about five months to design and carry out, including scrapping my first idea, learning how to work with the potentiometer, adjusting the sleeve to fit, etc. If you knew what you were doing and had all the parts it would probably take a couple of days to put everything together. But what is the fun in only doing projects where you already know the outcome? Maybe it’s time to set my sights on that galvanometer idea…

Pingback: This Is What Happens When You Make Your First Wearable #WearableWednesday #wearabletech #DIY « Adafruit Industries – Makers, hackers, artists, designers and engineers!
Pingback: Dance Hack Day 2017: a Whirlwind Adventure | In a Merry Hour: Caitlin E McDonald
Pingback: What Makes This Dance Hack 2017 Costume Sparkle #WearableWednesday #wearabletech #Arduino #DIY #art #dance – Arduino Boards News